Application Containerization and Microservice Orchestration
In this tutorial we will learn about basic application containerization using Docker and running various components of an application as microservices. We will utilize Docker Compose for orchestration during the development. This tutorial is targeted for beginners who have the basic familiarity with Docker. If you are new to Docker, we recommend you check out Docker Basics for Linux tutorial first.
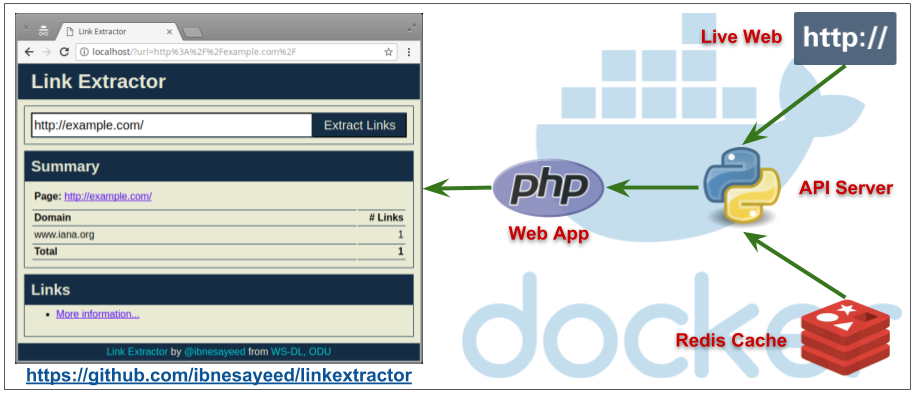
We will start from a basic Python script that scrapes links from a given web page and gradually evolve it into a multi-service application stack. The demo code is available in the Link Extractor repo. The code is organized in steps that incrementally introduce changes and new concepts. After completion, the application stack will contain the following microservices:
- A web application written in PHP and served using Apache that takes a URL as the input and summarizes extracted links from it
- The web application talks to an API server written in Python (and Ruby) that takes care of the link extraction and returns a JSON response
- A Redis cache that is used by the API server to avoid repeated fetch and link extraction for pages that are already scraped
The API server will only load the page of the input link from the web if it is not in the cache. The stack will eventually look like the figure below:
This tutorial was initially developed for a colloquium in the Computer Science Department of the Old Dominion University, Norfolk, Virginia. A video recording, presentation slides, and a brief description of the talk can be found in a blog post.
Steps:
- Stage Setup
- Step 0: Basic Link Extractor Script
- Step 1: Containerized Link Extractor Script
- Step 2: Link Extractor Module with Full URI and Anchor Text
- Step 3: Link Extractor API Service
- Step 4: Link Extractor API and Web Front End Services
- Step 5: Redis Service for Caching
- Step 6: Swap Python API Service with Ruby
- Conclusions
Stage Setup
Let’s get started by first cloning the demo code repository, changing the working directory, and checking the demo branch out.
git clone https://github.com/ibnesayeed/linkextractor.git
cd linkextractor
git checkout demo
Step 0: Basic Link Extractor Script
Checkout the step0 branch and list files in it.
git checkout step0
tree
.
├── README.md
└── linkextractor.py

0 directories, 2 files
The linkextractor.py file is the interesting one here, so let’s look at its contents:
cat linkextractor.py
#!/usr/bin/env python

import sys
import requests
from bs4 import BeautifulSoup

res = requests.get(sys.argv[-1])
soup = BeautifulSoup(res.text, "html.parser")
for link in soup.find_all("a"):
    print(link.get("href"))
This is a simple Python script that imports three packages: sys from the standard library and two popular third-party packages requests and bs4.
User-supplied command line argument (which is expected to be a URL to an HTML page) is used to fetch the page using the requests package, then parsed using the BeautifulSoup.
The parsed object is then iterated over to find all the anchor elements (i.e., <a> tags) and print the value of their href attribute that contains the hyperlink.
However, this seemingly simple script might not be the easiest one to run on a machine that does not meet its requirements.
The README.md file suggests how to run it, so let’s give it a try:
./linkextractor.py http://example.com/
bash: ./linkextractor.py: Permission denied
When we tried to execute it as a script, we got the Permission denied error.
Let’s check the current permissions on this file:
ls -l linkextractor.py
-rw-r--r-- 1 root root 220 Sep 23 16:26 linkextractor.py
This current permission -rw-r--r-- indicates that the script is not set to be executable.
We can either change it by running chmod a+x linkextractor.py or run it as a Python program instead of a self-executing script as illustrated below:
python linkextractor.py
Traceback (most recent call last):
  File "linkextractor.py", line 5, in <module>
    from bs4 import BeautifulSoup
ImportError: No module named bs4
Here we got the first ImportError message because we are missing the third-party package needed by the script.
We can install that Python package (and potentially other missing packages) using one of the many techniques to make it work, but it is too much work for such a simple script, which might not be obvious for those who are not familiar with Python’s ecosystem.
Depending on which machine and operating system you are trying to run this script on, what software is already installed, and how much access you have, you might face some of these potential difficulties:
- Is the script executable?
- Is Python installed on the machine?
- Can you install software on the machine?
- Is
pipinstalled? - Are
requestsandbeautifulsoup4Python libraries installed?
This is where application containerization tools like Docker come in handy. In the next step we will try to containerize this script and make it easier to execute.
Step 1: Containerized Link Extractor Script
Checkout the step1 branch and list files in it.
git checkout step1
tree
.
├── Dockerfile
├── README.md
└── linkextractor.py

0 directories, 3 files
We have added one new file (i.e., Dockerfile) in this step.
Let’s look into its contents:
cat Dockerfile
FROM       python:3
LABEL      maintainer="Sawood Alam <@ibnesayeed>"

RUN        pip install beautifulsoup4
RUN        pip install requests

WORKDIR    /app
COPY       linkextractor.py /app/
RUN        chmod a+x linkextractor.py

ENTRYPOINT ["./linkextractor.py"]
Using this Dockerfile we can prepare a Docker image for this script.
We start from the official python Docker image that contains Python’s run-time environment as well as necessary tools to install Python packages and dependencies.
We then add some metadata as labels (this step is not essential, but is a good practice nonetheless).
Next two instructions run the pip install command to install the two third-party packages needed for the script to function properly.
We then create a working directory /app, copy the linkextractor.py file in it, and change its permissions to make it an executable script.
Finally, we set the script as the entrypoint for the image.
So far, we have just described how we want our Docker image to be like, but didn’t really build one. So let’s do just that:
docker image build -t linkextractor:step1 .
This command should yield an output as illustrated below:
Sending build context to Docker daemon  171.5kB
Step 1/8 : FROM       python:3

... [OUTPUT REDACTED] ...

Successfully built 226196ada9ab
Successfully tagged linkextractor:step1
We have created a Docker image named linkextractor:step1 based on the Dockerfile illustrated above.
If the build was successful, we should be able to see it in the list of image:
docker image ls
REPOSITORY          TAG                 IMAGE ID            CREATED             SIZE
linkextractor       step1               e067c677be37        2 seconds ago       931MB
python              3                   a9d071760c82        2 weeks ago         923MB
This image should have all the necessary ingredients packaged in it to run the script anywhere on a machine that supports Docker. Now, let’s run a one-off container with this image and extract links from some live web pages:
docker container run -it --rm linkextractor:step1 http://example.com/
This outputs a single link that is present in the simple example.com web page:
http://www.iana.org/domains/example
Let’s try it on a web page with more links in it:
docker container run -it --rm linkextractor:step1 https://training.play-with-docker.com/
/
/about/
#ops
#dev
/ops-stage1
/ops-stage2
/ops-stage3
/dev-stage1
/dev-stage2
/dev-stage3
/alacart
https://twitter.com/intent/tweet?text=Play with Docker Classroom&url=https://training.play-with-docker.com/&via=docker&related=docker
https://facebook.com/sharer.php?u=https://training.play-with-docker.com/
https://plus.google.com/share?url=https://training.play-with-docker.com/
http://www.linkedin.com/shareArticle?mini=true&url=https://training.play-with-docker.com/&title=Play%20with%20Docker%20Classroom&source=https://training.play-with-docker.com
https://2018.dockercon.com/
https://2018.dockercon.com/
https://success.docker.com/training/
https://community.docker.com/registrations/groups/4316
https://docker.com
https://www.docker.com
https://www.facebook.com/docker.run
https://twitter.com/docker
https://www.github.com/play-with-docker/play-with-docker.github.io
This looks good, but we can improve the output. For example, some links are relative, we can convert them into full URLs and also provide the anchor text they are linked to. In the next step we will make these changes and some other improvements to the script.
Step 2: Link Extractor Module with Full URI and Anchor Text
Checkout the step2 branch and list files in it.
git checkout step2
tree
.
├── Dockerfile
├── README.md
└── linkextractor.py

0 directories, 3 files
In this step the linkextractor.py script is updated with the following functional changes:
- Paths are normalized to full URLs
- Reporting both links and anchor texts
- Usable as a module in other scripts
Let’s have a look at the updated script:
cat linkextractor.py
#!/usr/bin/env python

import sys
import requests
from bs4 import BeautifulSoup
from urllib.parse import urljoin

def extract_links(url):
    res = requests.get(url)
    soup = BeautifulSoup(res.text, "html.parser")
    base = url
    # TODO: Update base if a <base> element is present with the href attribute
    links = []
    for link in soup.find_all("a"):
        links.append({
            "text": " ".join(link.text.split()) or "[IMG]",
            "href": urljoin(base, link.get("href"))
        })
    return links

if __name__ == "__main__":
    if len(sys.argv) != 2:
        print("\nUsage:\n\t{} <URL>\n".format(sys.argv[0]))
        sys.exit(1)
    for link in extract_links(sys.argv[-1]):
        print("[{}]({})".format(link["text"], link["href"]))
The link extraction logic is abstracted into a function extract_links that accepts a URL as a parameter and returns a list of objects containing anchor texts and normalized hyperlinks.
This functionality can now be imported into other scripts as a module (which we will utilize in the next step).
Now, let’s build a new image and see these changes in effect:
docker image build -t linkextractor:step2 .
We have used a new tag linkextractor:step2 for this image so that we don’t overwrite the image from the step0 to illustrate that they can co-exist and containers can be run using either of these images.
docker image ls
REPOSITORY          TAG                 IMAGE ID            CREATED              SIZE
linkextractor       step2               be2939eada96        3 seconds ago        931MB
linkextractor       step1               673d045a822f        About a minute ago   931MB
python              3                   a9d071760c82        2 weeks ago          923MB
Running a one-off container using the linkextractor:step2 image should now yield an improved output:
docker container run -it --rm linkextractor:step2 https://training.play-with-docker.com/
[Play with Docker classroom](https://training.play-with-docker.com/)
[About](https://training.play-with-docker.com/about/)
[IT Pros and System Administrators](https://training.play-with-docker.com/#ops)
[Developers](https://training.play-with-docker.com/#dev)
[Stage 1: The Basics](https://training.play-with-docker.com/ops-stage1)
[Stage 2: Digging Deeper](https://training.play-with-docker.com/ops-stage2)
[Stage 3: Moving to Production](https://training.play-with-docker.com/ops-stage3)
[Stage 1: The Basics](https://training.play-with-docker.com/dev-stage1)
[Stage 2: Digging Deeper](https://training.play-with-docker.com/dev-stage2)
[Stage 3: Moving to Staging](https://training.play-with-docker.com/dev-stage3)
[Full list of individual labs](https://training.play-with-docker.com/alacart)
[[IMG]](https://twitter.com/intent/tweet?text=Play with Docker Classroom&url=https://training.play-with-docker.com/&via=docker&related=docker)
[[IMG]](https://facebook.com/sharer.php?u=https://training.play-with-docker.com/)
[[IMG]](https://plus.google.com/share?url=https://training.play-with-docker.com/)
[[IMG]](http://www.linkedin.com/shareArticle?mini=true&url=https://training.play-with-docker.com/&title=Play%20with%20Docker%20Classroom&source=https://training.play-with-docker.com)
[[IMG]](https://2018.dockercon.com/)
[DockerCon 2018 in San Francisco](https://2018.dockercon.com/)
[training.docker.com](https://success.docker.com/training/)
[Register here](https://community.docker.com/registrations/groups/4316)
[Docker, Inc.](https://docker.com)
[[IMG]](https://www.docker.com)
[[IMG]](https://www.facebook.com/docker.run)
[[IMG]](https://twitter.com/docker)
[[IMG]](https://www.github.com/play-with-docker/play-with-docker.github.io)
Running a container using the previous image linkextractor:step1 should still result in the old output:
docker container run -it --rm linkextractor:step1 https://training.play-with-docker.com/
So far, we have learned how to containerize a script with its necessary dependencies to make it more portable. We have also learned how to make changes in the application and build different variants of Docker images that can co-exist. In the next step we will build a web service that will utilize this script and will make the service run inside a Docker container.
Step 3: Link Extractor API Service
Checkout the step3 branch and list files in it.
git checkout step3
tree
.
├── Dockerfile
├── README.md
├── linkextractor.py
├── main.py
└── requirements.txt

0 directories, 5 files
The following changes have been made in this step:
- Added a server script
main.pythat utilizes the link extraction module written in the last step - The
Dockerfileis updated to refer to themain.pyfile instead - Server is accessible as a WEB API at
http://<hostname>[:<prt>]/api/<url> - Dependencies are moved to the
requirements.txtfile - Needs port mapping to make the service accessible outside of the container (the
Flaskserver used here listens on port5000by default)
Let’s first look at the Dockerfile for changes:
cat Dockerfile
FROM       python:3
LABEL      maintainer="Sawood Alam <@ibnesayeed>"

WORKDIR    /app
COPY       requirements.txt /app/
RUN        pip install -r requirements.txt

COPY       *.py /app/
RUN        chmod a+x *.py

CMD        ["./main.py"]
Since we have started using requirements.txt for dependencies, we no longer need to run pip install command for individual packages.
The ENTRYPOINT directive is replaced with the CMD and it is referring to the main.py script that has the server code it because we do not want to use this image for one-off commands now.
The linkextractor.py module remains unchanged in this step, so let’s look into the newly added main.py file:
cat main.py
#!/usr/bin/env python

from flask import Flask
from flask import request
from flask import jsonify
from linkextractor import extract_links

app = Flask(__name__)

@app.route("/")
def index():
    return "Usage: http://<hostname>[:<prt>]/api/<url>"

@app.route("/api/<path:url>")
def api(url):
    qs = request.query_string.decode("utf-8")
    if qs != "":
        url += "?" + qs
    links = extract_links(url)
    return jsonify(links)

app.run(host="0.0.0.0")
Here, we are importing extract_links function from the linkextractor module and converting the returned list of objects into a JSON response.
It’s time to build a new image with these changes in place:
docker image build -t linkextractor:step3 .
Then run the container in detached mode (-d flag) so that the terminal is available for other commands while the container is still running.
Note that we are mapping the port 5000 of the container with the 5000 of the host (using -p 5000:5000 argument) to make it accessible from the host.
We are also assigning a name (--name=linkextractor) to the container to make it easier to see logs and kill or remove the container.
docker container run -d -p 5000:5000 --name=linkextractor linkextractor:step3
If things go well, we should be able to see the container being listed in Up condition:
docker container ls
CONTAINER ID        IMAGE                 COMMAND             CREATED             STATUSPORTS                    NAMES
d69c0150a754        linkextractor:step3   "./main.py"         9 seconds ago       Up 8 seconds0.0.0.0:5000->5000/tcp   linkextractor
We can now make an HTTP request in the form /api/<url> to talk to this server and fetch the response containing extracted links:
curl -i http://localhost:5000/api/http://example.com/
HTTP/1.0 200 OK
Content-Type: application/json
Content-Length: 78
Server: Werkzeug/0.14.1 Python/3.7.0
Date: Sun, 23 Sep 2018 20:52:56 GMT

[{"href":"http://www.iana.org/domains/example","text":"More information..."}]
Now, we have the API service running that accepts requests in the form /api/<url> and responds with a JSON containing hyperlinks and anchor texts of all the links present in the web page at give <url>.
Since the container is running in detached mode, so we can’t see what’s happening inside, but we can see logs using the name linkextractor we assigned to our container:
docker container logs linkextractor
* Serving Flask app "main" (lazy loading)
* Environment: production
  WARNING: Do not use the development server in a production environment.
  Use a production WSGI server instead.
* Debug mode: off
* Running on http://0.0.0.0:5000/ (Press CTRL+C to quit)
172.17.0.1 - - [23/Sep/2018 20:52:56] "GET /api/http://example.com/ HTTP/1.1" 200 -
We can see the messages logged when the server came up, and an entry of the request log when we ran the curl command.
Now we can kill and remove this container:
docker container rm -f linkextractor
In this step we have successfully ran an API service listening on port 5000.
This is great, but APIs and JSON responses are for machines, so in the next step we will run a web service with a human-friendly web interface in addition to this API service.
Step 4: Link Extractor API and Web Front End Services
Checkout the step4 branch and list files in it.
git checkout step4
tree
.
├── README.md
├── api
│   ├── Dockerfile
│   ├── linkextractor.py
│   ├── main.py
│   └── requirements.txt
├── docker-compose.yml
└── www
    └── index.php

2 directories, 7 files
In this step the following changes have been made since the last step:
- The link extractor JSON API service (written in Python) is moved in a separate
./apifolder that has the exact same code as in the previous step - A web front-end application is written in PHP under
./wwwfolder that talks to the JSON API - The PHP application is mounted inside the official
php:7-apacheDocker image for easier modification during the development - The web application is made accessible at
http://<hostname>[:<prt>]/?url=<url-encoded-url> - An environment variable
API_ENDPOINTis used inside the PHP application to configure it to talk to the JSON API server - A
docker-compose.ymlfile is written to build various components and glue them together
In this step we are planning to run two separate containers, one for the API and the other for the web interface. The latter needs a way to talk to the API server. For the two containers to be able to talk to each other, we can either map their ports on the host machine and use that for request routing or we can place the containers in a single private network and access directly. Docker has an excellent support of networking and provides helpful commands to deal with networks. Additionally, in a Docker network containers identify themselves using their names as hostnames to avoid hunting for their IP addresses in the private network. However, we are not going to do any of this manually, instead we will be using Docker Compose to automate many of these tasks.
So let’s look at the docker-compose.yml file we have:
cat docker-compose.yml
version: '3'

services:
  api:
    image: linkextractor-api:step4-python
    build: ./api
    ports:
      - "5000:5000"
  web:
    image: php:7-apache
    ports:
      - "80:80"
    environment:
      - API_ENDPOINT=http://api:5000/api/
    volumes:
      - ./www:/var/www/html
This is a simple YAML file that describes the two services api and web.
The api service will use the linkextractor-api:step4-python image that is not built yet, but will be built on-demand using the Dockerfile from the ./api directory.
This service will be exposed on the port 5000 of the host.
The second service named web will use official php:7-apache image directly from the DockerHub, that’s why we do not have a Dockerfile for it.
The service will be exposed on the default HTTP port (i.e., 80).
We will supply an environment variable named API_ENDPOINT with the value http://api:5000/api/ to tell the PHP script where to connect to for the API access.
Notice that we are not using an IP address here, instead, api:5000 is being used because we will have a dynamic hostname entry in the private network for the API service matching its service name.
Finally, we will bind mount the ./www folder to make the index.php file available inside of the web service container at /var/www/html, which is the default web root for the Apache web server.
Now, let’s have a look at the user-facing www/index.php file:
cat www/index.php
This is a long file that mainly contains all the markup and styles of the page. However, the important block of code is in the beginning of the file as illustrated below:
$api_endpoint = $_ENV["API_ENDPOINT"] ?: "http://localhost:5000/api/";
$url = "";
if(isset($_GET["url"]) && $_GET["url"] != "") {
  $url = $_GET["url"];
  $json = @file_get_contents($api_endpoint . $url);
  if($json == false) {
    $err = "Something is wrong with the URL: " . $url;
  } else {
    $links = json_decode($json, true);
    $domains = [];
    foreach($links as $link) {
      array_push($domains, parse_url($link["href"], PHP_URL_HOST));
    }
    $domainct = @array_count_values($domains);
    arsort($domainct);
  }
}
The $api_endpoint variable is initialized with the value of the environment variable supplied from the docker-compose.yml file as $_ENV["API_ENDPOINT"] (otherwise falls back to a default value of http://localhost:5000/api/).
The request is made using file_get_contents function that uses the $api_endpoint variable and user supplied URL from $_GET["url"].
Some analysis and transformations are performed on the received response that are later used in the markup to populate the page.
Let’s bring these services up in detached mode using docker-compose utility:
docker-compose up -d --build
Creating network "linkextractor_default" with the default driver
Pulling web (php:7-apache)...
7-apache: Pulling from library/php

... [OUTPUT REDACTED] ...

Status: Downloaded newer image for php:7-apache
Building api
Step 1/8 : FROM       python:3

... [OUTPUT REDACTED] ...

Successfully built 1f419be1c2bf
Successfully tagged linkextractor-api:step4-python
Creating linkextractor_web_1 ... done
Creating linkextractor_api_1 ... done
This output shows that Docker Compose automatically created a network named linkextractor_default, pulled php:7-apache image from DockerHub, built api:python image using our local Dockerfile, and finally, spun two containers linkextractor_web_1 and linkextractor_api_1 that correspond to the two services we have defined in the YAML file above.
Checking for the list of running containers confirms that the two services are indeed running:
docker container ls
CONTAINER ID        IMAGE               COMMAND                  CREATED             STATUS   PORTS                    NAMES
268b021b5a2c        php:7-apache                     "docker-php-entrypoi…"   3 minutes ago       Up 3 minutes        0.0.0.0:80->80/tcp       linkextractor_web_1
5bc266b4e43d        linkextractor-api:step4-python   "./main.py"              3 minutes ago       Up 3 minutes        0.0.0.0:5000->5000/tcp   linkextractor_api_1
We should now be able to talk to the API service as before:
curl -i http://localhost:5000/api/http://example.com/
To access the web interface click to open the Link Extractor.
Then fill the form with https://training.play-with-docker.com/ (or any HTML page URL of your choice) and submit to extract links from it.
We have just created an application with microservice architecture, isolating individual tasks in separate services as opposed to monolithic applications where everything is put together in a single unit. Microservice applications are relatively easier to scale, maintains, and move around. They also allow easy swapping of components with an equivalent service. More on that later.
Now, let’s modify the www/index.php file to replace all occurrences of Link Extractor with Super Link Extractor:
sed -i 's/Link Extractor/Super Link Extractor/g' www/index.php
Reloading the web interface of the application should now reflect this change in the title, header, and footer.
This is happening because the ./www folder is bind mounted inside of the container, so any changes made outside will reflect inside the container or the vice versa.
This approach is very helpful in development, but in the production environment we would prefer our Docker images to be self-contained.
Let’s revert these changes now to clean the Git tracking:
git reset --hard
Before we move on to the next step we need to shut these services down, but Docker Compose can help us take care of it very easily:
docker-compose down
Stopping linkextractor_api_1 ... done
Stopping linkextractor_web_1 ... done
Removing linkextractor_api_1 ... done
Removing linkextractor_web_1 ... done
Removing network linkextractor_default
In the next step we will add one more service to our stack and will build a self-contained custom image for our web interface service.
Step 5: Redis Service for Caching
Checkout the step5 branch and list files in it.
git checkout step5
tree
.
├── README.md
├── api
│   ├── Dockerfile
│   ├── linkextractor.py
│   ├── main.py
│   └── requirements.txt
├── docker-compose.yml
└── www
    ├── Dockerfile
    └── index.php

2 directories, 8 files
Some noticeable changes from the previous step are as following:
- Another
Dockerfileis added in the./wwwfolder for the PHP web application to build a self-contained image and avoid live file mounting - A Redis container is added for caching using the official Redis Docker image
- The API service talks to the Redis service to avoid downloading and parsing pages that were already scraped before
- A
REDIS_URLenvironment variable is added to the API service to allow it to connect to the Redis cache
Let’s first inspect the newly added Dockerfile under the ./www folder:
cat www/Dockerfile
FROM       php:7-apache
LABEL      maintainer="Sawood Alam <@ibnesayeed>"

ENV        API_ENDPOINT="http://localhost:5000/api/"

COPY       . /var/www/html/
This is a rather simple Dockerfile that uses the official php:7-apache image as the base and copies all the files from the ./www folder into the /var/www/html/ folder of the image.
This is exactly what was happening in the previous step, but that was bind mounted using a volume, while here we are making the code part of the self-contained image.
We have also added the API_ENDPOINT environment variable here with a default value, which implicitly suggests that this is an important information that needs to be present in order for the service to function properly (and should be customized at run time with an appropriate value).
Next, we will look at the API server’s api/main.py file where we are utilizing the Redis cache:
cat api/main.py
The file has many lines, but the important bits are as illustrated below:
redis_conn = redis.from_url(os.getenv("REDIS_URL", "redis://localhost:6379"))
# ...
    jsonlinks = redis.get(url)
    if not jsonlinks:
        links = extract_links(url)
        jsonlinks = json.dumps(links, indent=2)
        redis.set(url, jsonlinks)
This time the API service needs to know how to connect to the Redis instance as it is going to use it for caching.
This information can be made available at run time using the REDIS_URL environment variable.
A corresponding ENV entry is also added in the Dockerfile of the API service with a default value.
A redis client instance is created using the hostname redis (same as the name of the service as we will see later) and the default Redis port 6379.
We are first trying to see if a cache is present in the Redis store for a given URL, if not then we use the extract_links function as before and populate the cache for future attempts.
Now, let’s look into the updated docker-compose.yml file:
cat docker-compose.yml
version: '3'

services:
  api:
    image: linkextractor-api:step5-python
    build: ./api
    ports:
      - "5000:5000"
    environment:
      - REDIS_URL=redis://redis:6379
  web:
    image: linkextractor-web:step5-php
    build: ./www
    ports:
      - "80:80"
    environment:
      - API_ENDPOINT=http://api:5000/api/
  redis:
    image: redis
The api service configuration largely remains the same as before, except the updated image tag and added environment variable REDIS_URL that points to the Redis service.
For the web service, we are using the custom linkextractor-web:step5-php image that will be built using the newly added Dockerfile in the ./www folder.
We are no longer mounting the ./www folder using the volumes config.
Finally, a new service named redis is added that will use the official image from DockerHub and needs no specific configurations for now.
This service is accessible to the Python API using its service name, the same way the API service is accessible to the PHP front-end service.
Let’s boot these services up:
docker-compose up -d --build
... [OUTPUT REDACTED] ...

Creating linkextractor_web_1   ... done
Creating linkextractor_api_1   ... done
Creating linkextractor_redis_1 ... done
Now, that all three services are up, access the web interface by clicking the Link Extractor.
There should be no visual difference from the previous step.
However, if you extract links from a page with a lot of links, the first time it should take longer, but the successive attempts to the same page should return the response fairly quickly.
To check whether or not the Redis service is being utilized, we can use docker-compose exec followed by the redis service name and the Redis CLI’s monitor command:
docker-compose exec redis redis-cli monitor
Now, try to extract links from some web pages using the web interface and see the difference in Redis log entries for pages that are scraped the first time and those that are repeated.
Before continuing further with the tutorial, stop the interactive monitor stream as a result of the above redis-cli command by pressing Ctrl + C keys while the interactive terminal is in focus.
Now that we are not mounting the /www folder inside the container, local changes should not reflect in the running service:
sed -i 's/Link Extractor/Super Link Extractor/g' www/index.php
Verify that the changes made locally do not reflect in the running service by reloading the web interface and then revert changes:
git reset --hard
Now, shut these services down and get ready for the next step:
docker-compose down
Stopping linkextractor_web_1   ... done
Stopping linkextractor_redis_1 ... done
Stopping linkextractor_api_1   ... done
Removing linkextractor_web_1   ... done
Removing linkextractor_redis_1 ... done
Removing linkextractor_api_1   ... done
Removing network linkextractor_default
We have successfully orchestrated three microservices to compose our Link Extractor application. We now have an application stack that represents the architecture illustrated in the figure shown in the introduction of this tutorial. In the next step we will explore how easy it is to swap components from an application with the microservice architecture.
Step 6: Swap Python API Service with Ruby
Checkout the step6 branch and list files in it.
git checkout step6
tree
.
├── README.md
├── api
│   ├── Dockerfile
│   ├── Gemfile
│   └── linkextractor.rb
├── docker-compose.yml
├── logs
└── www
    ├── Dockerfile
    └── index.php

3 directories, 7 files
Some significant changes from the previous step include:
- The API service written in Python is replaced with a similar Ruby implementation
- The
API_ENDPOINTenvironment variable is updated to point to the new Ruby API service - The link extraction cache event (HIT/MISS) is logged and is persisted using volumes
Notice that the ./api folder does not contain any Python scripts, instead, it now has a Ruby file and a Gemfile to manage dependencies.
Let’s have a quick walk through the changed files:
cat api/linkextractor.rb
#!/usr/bin/env ruby
# encoding: utf-8

require "sinatra"
require "open-uri"
require "uri"
require "nokogiri"
require "json"
require "redis"

set :protection, :except=>:path_traversal

redis = Redis.new(url: ENV["REDIS_URL"] || "redis://localhost:6379")

Dir.mkdir("logs") unless Dir.exist?("logs")
cache_log = File.new("logs/extraction.log", "a")

get "/" do
  "Usage: http://<hostname>[:<prt>]/api/<url>"
end

get "/api/*" do
  url = [params['splat'].first, request.query_string].reject(&:empty?).join("?")
  cache_status = "HIT"
  jsonlinks = redis.get(url)
  if jsonlinks.nil?
    cache_status = "MISS"
    jsonlinks = JSON.pretty_generate(extract_links(url))
    redis.set(url, jsonlinks)
  end

  cache_log.puts "#{Time.now.to_i}\t#{cache_status}\t#{url}"

  status 200
  headers "content-type" => "application/json"
  body jsonlinks
end

def extract_links(url)
  links = []
  doc = Nokogiri::HTML(open(url))
  doc.css("a").each do |link|
    text = link.text.strip.split.join(" ")
    begin
      links.push({
        text: text.empty? ? "[IMG]" : text,
        href: URI.join(url, link["href"])
      })
    rescue
    end
  end
  links
end
This Ruby file is almost equivalent to what we had in Python before, except, in addition to that it also logs the link extraction requests and corresponding cache events. In a microservice architecture application swapping components with an equivalent one is easy as long as the expectations of consumers of the component are maintained.
cat api/Dockerfile
FROM       ruby:2.6
LABEL      maintainer="Sawood Alam <@ibnesayeed>"

ENV        LANG C.UTF-8
ENV        REDIS_URL="redis://localhost:6379"

WORKDIR    /app
COPY       Gemfile /app/
RUN        bundle install

COPY       linkextractor.rb /app/
RUN        chmod a+x linkextractor.rb

CMD        ["./linkextractor.rb", "-o", "0.0.0.0"]
Above Dockerfile is written for the Ruby script and it is pretty much self-explanatory.
cat docker-compose.yml
version: '3'

services:
  api:
    image: linkextractor-api:step6-ruby
    build: ./api
    ports:
      - "4567:4567"
    environment:
      - REDIS_URL=redis://redis:6379
    volumes:
      - ./logs:/app/logs
  web:
    image: linkextractor-web:step6-php
    build: ./www
    ports:
      - "80:80"
    environment:
      - API_ENDPOINT=http://api:4567/api/
  redis:
    image: redis
The docker-compose.yml file has a few minor changes in it.
The api service image is now named linkextractor-api:step6-ruby, the port mapping is changed from 5000 to 4567 (which is the default port for Sinatra server), and the API_ENDPOINT environment variable in the web service is updated accordingly so that the PHP code can talk to it.
With these in place, let’s boot our service stack:
docker-compose up -d --build
... [OUTPUT REDACTED] ...

Successfully built b713eef49f55
Successfully tagged linkextractor-api:step6-ruby
Creating linkextractor_web_1   ... done
Creating linkextractor_api_1   ... done
Creating linkextractor_redis_1 ... done
We should now be able to access the API (using the updated port number):
curl -i http://localhost:4567/api/http://example.com/
HTTP/1.1 200 OK
Content-Type: application/json
Content-Length: 96
X-Content-Type-Options: nosniff
Server: WEBrick/1.4.2 (Ruby/2.5.1/2018-03-29)
Date: Mon, 24 Sep 2018 01:41:35 GMT
Connection: Keep-Alive

[
  {
    "text": "More information...",
    "href": "http://www.iana.org/domains/example"
  }
]
Now, open the web interface by clicking the Link Extractor and extract links of a few URLs. Also, try to repeat these attempts for some URLs. If everything is alright, the web application should behave as before without noticing any changes in the API service (which is completely replaced).
We can shut the stack down now:
docker-compose down
Since we have persisted logs, they should still be available after the services are gone:
cat logs/extraction.log
1537753295      MISS    http://example.com/
1537753600      HIT     http://example.com/
1537753635      MISS    https://training.play-with-docker.com/
This illustrates that the caching is functional as the second attempt to the http://example.com/ resulted in a cache HIT.
In this step we explored the possibility of swapping components of an application with microservice architecture with their equivalents without impacting rest of the parts of the stack. We have also explored data persistence using bind mount volumes that persists even after the containers writing to the volume are gone.
So far, we have used docker-compose utility to orchestrate the application stack, which is good for development environment, but for production environment we use docker stack deploy command to run the application in a Docker Swarm Cluster.
It is left for you as an assignment to deploy this application in a Docker Swarm Cluster.
Conclusions
We started this tutorial with a simple Python script that scrapes links from a give web page URL. We demonstrated various difficulties in running the script. We then illustrated how easy to run and portable the script becomes onces it is containerized. In the later steps we gradually evolved the script into a multi-service application stack. In the process we explored various concepts of microservice architecture and how Docker tools can be helpful in orchestrating a multi-service stack. Finally, we demonstrated the ease of microservice component swapping and data persistence.